Watts Home Support
- Which devices are compatible with the Watts Home app?
- What are the WiFi connectivity requirements?
- How do I create a new Watts account?
- How do I change my account name?
- How do I recover or change my password?
- How do I add a location?
- How do I edit a location, delete a location and edit order of locations?
- How do I add a device?
- How do I change a device's name, delete a device and edit order of devices?
- How do I change the Dashboard layout view?
- Why is the app rejecting the device Registration Code?
- How do I share access to my devices to others, such as my family or building caretaker?
- How does the Home/Away toggle work?
- How do I change the Floor Heating temperature?
- How do I change the device schedule?
- How do I view the energy usage?
- How do I open the energy usage report?
- How do I change the fan operation?
- How do I change the humidity settings?
- How do I setup the app to receive alert notifications?
- How do I view the status of the sensors for my snow melt system?
- How do I change the settings on my snow melt system?
- How do I change the language?
- How do I change the app appearance?
- Does the app work on tablet devices?
- Google Home in-app integration.
- Amazon Alexa in-app integration.
- I registered a device but now it’s missing:
- The app shows that the device is not available. How do I correct this issue?
- Who can help me?
- How do I check my software version?
1. Which devices are compatible with the Watts Home app?
The following devices are compatible:
- tekmar WiFi Setpoint Control 170
- tekmar WiFi Thermostats 561, 562, 563, 564, 564B
- tekmar WiFi Snow Melting Control 670 and 671
- SunStat Connect Thermostat
- SunStat Connect Plus
- SunStat Command Plus
2. What are the WiFi connectivity requirements?
The devices require WiFi version N using a 2.4 GHz signal and WPA2 encryption. WEP encryption is not supported.
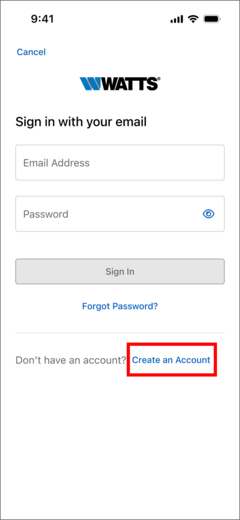
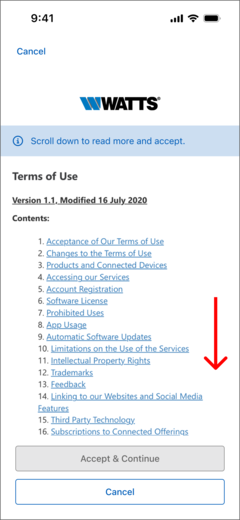
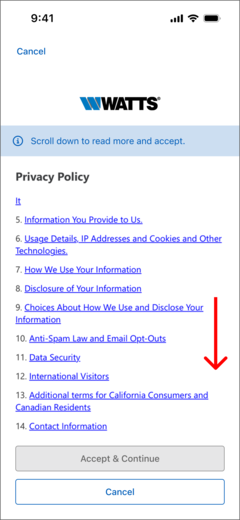
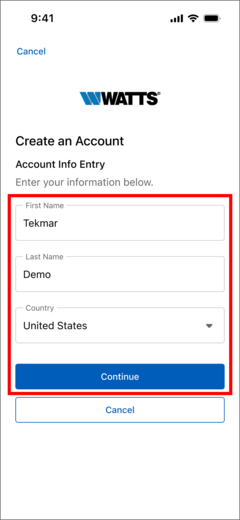
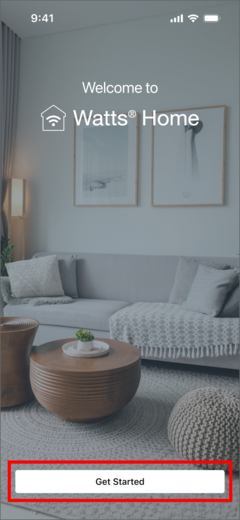
3. How do I create a new Watts account?
- Select Get Started
- Select Sign up now
- Scroll through the Terms of Use and select "Accept & Continue" button
- Scroll through the Privacy Policy and select "Accept & Continue" button
- Enter your email address and select "Send Code" button
- Check your email inbox for an email from Watts with a verification code
- Enter the 6-digit verification code and select "Verify" button
- Provide Account information and select "Continue" button
- Enter your "Password" and repeat password
- Select "Create Account" button to create a new Watts Home account


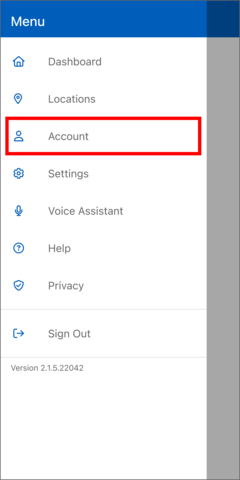
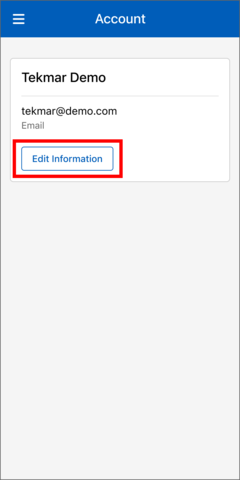
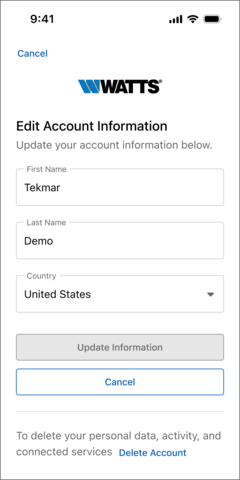
4. How do I change my account name?
- Select "Account" from the menu page
- Select "Edit Information" button
- Edit your account information and select "Update Information" button
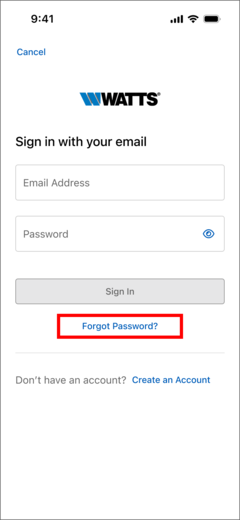
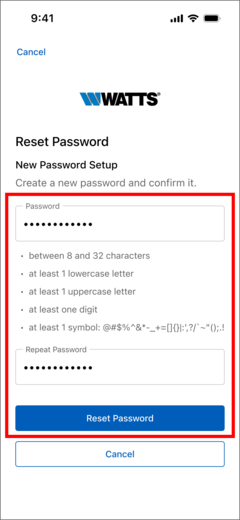
5. How do I recover or change my password?
- Select Get Started. If you are logged in the app, select "Sign Out" from main menu
- Select "Forgot password?"
- Enter your email address and select "Send Code" button
- Check your email inbox for an email from Watts with verification code
- Enter the 6-digit verification code and select "Verify" button
- Enter your new password and repeat password
- Select "Reset Password" button


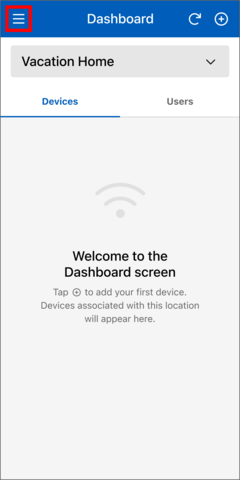
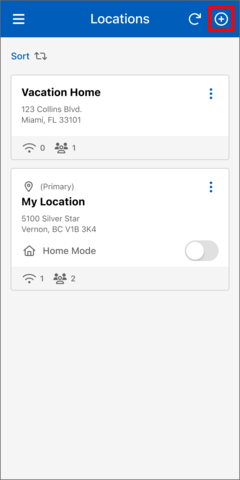
6. How do I add a location?
When you setup a new account, you must create a location to be associated with your account e.g., "My Location", and this location is designated as your "Primary" location.
"Standard Order (A-Z)" shows locations in alphanumerical order (1, 2, 3, ... a, b, c...) and the feature is enabled when you have two or more locations.
To add a new location (Standard Order), follow these steps:
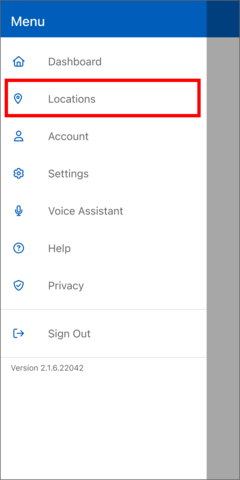
- Select the menu icon (3 lines in the upper left corner)
- Select "Locations" from the menu page
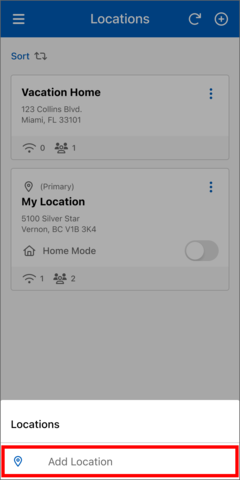
- Select the "+" icon
- Select "Add Location"
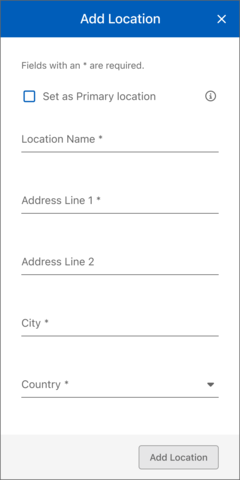
- Enter the location's information. With "Standard Order" selected, you can make this the primary location that is shown when the app opens
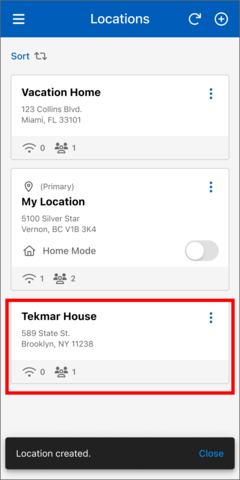
- When "Standard Order" has been selected, your new location will be listed in alphanumerical order, where the "Primary" location is always shown on top
"Custom Order" lets you arrange your list of locations in a way that you choose yourself, and feature is enabled, when you have two or more locations.
To add a new location (Custom Order), follow these steps:
- Select the menu icon (3 lines in the upper left corner)
- Select "Locations" from the menu page
- Select the "+" icon
- Select "Add Location"
- Enter the location's information. With "Custom Order" selected, you can change its order in the list; where if placed as the first location, it will be the location shown when the app opens
- Select "Cancel" button on the pop-up
- When "Custom Order" has been selected, your new location will be listed in the bottom of the location's list


To add a new location and edit order of locations, follow these steps:
- Select the menu icon (3 lines in the upper left corner)
- Select "Locations" from the menu page
- Select the "+" icon
- Select "Add Location"
- Enter the location's information. With "Custom Order" selected, you can change its order in the list; where if placed as the first location, it will be the location shown when the app opens
- Select "Edit Order" button on the pop-up
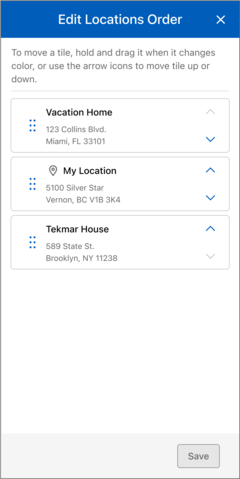
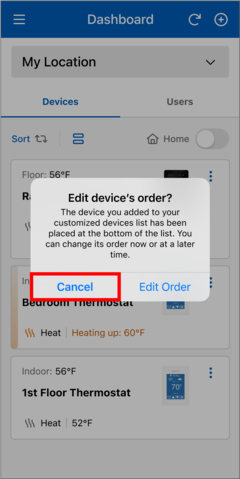
- Next, the "Edit Locations Order" page will appear, to rearrange your locations press and hold a location tile until its color changes, then drag it to your preferred location. Alternatively, you can use the arrow icons to move it up or down.


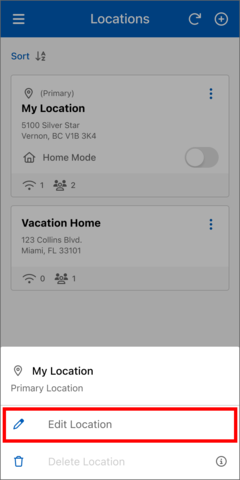
7. How do I edit a location, delete a location and edit order of locations?
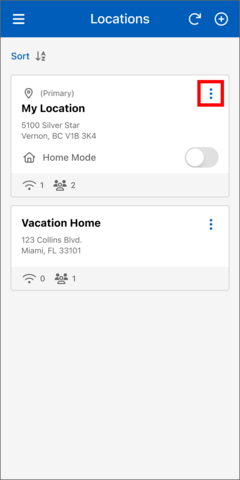
When Custom Order is selected, follow these steps to edit the order of your locations:
- Select "Sort" button on the Locations page
- Select the "Edit Locations Order" button from the bottom menu. This button is only enabled when "Custom Order" is selected.
- On the "Edit Locations Order" page to move a location tile, press and hold until it changes color, then drag and drop it to your desired destination. Alternatively, you can use the arrow icons to move it up or down.
- Select the "Save" button, once you've made changes to the order.
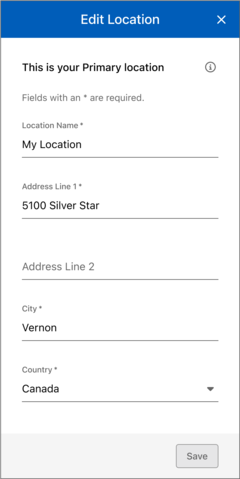
To edit a location, follow these steps:
- Select the menu icon (3 lines in the upper left corner)
- Select "Locations" from the menu page
- Select the ellipsis icon
- Select "Edit Location"
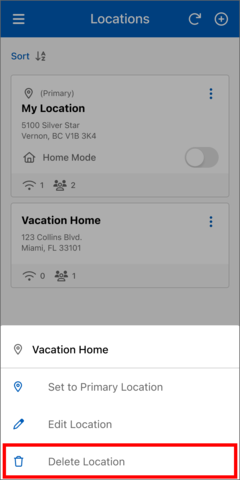
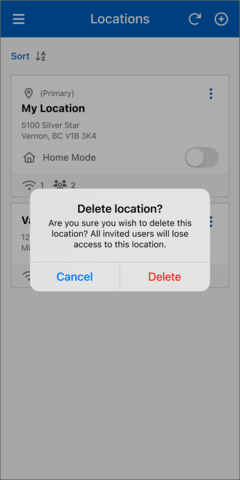
To delete a location, follow these steps:
- Select the menu icon (3 lines in the upper left corner)
- Select "Locations"
- Select the ellipsis icon
- Select "Delete Location"
- Confirm deletion by selecting the "Delete" button


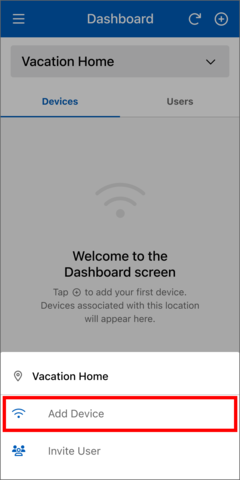
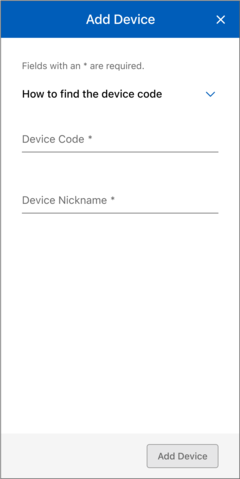
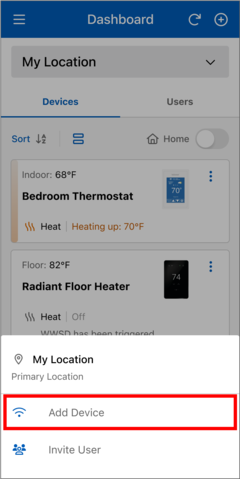
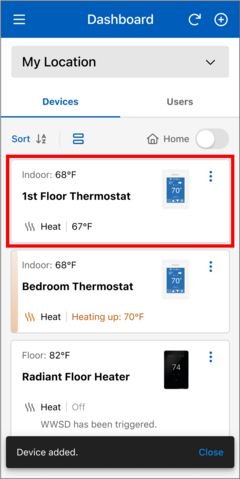
8. How do I add a device?
To add a device to the selected location, follow these steps:
- Select the "+" icon
- Select "Add Device"
- Enter the 8-digit registration code from the device's WiFi or Services menu
- Enter the device's Nickname
- Select the "Add Device" button

"Standard Order (A-Z)" shows Devices in alphanumerical order (1, 2, 3, ... a, b, c...) and the feature is enabled, when you have two or more devices.
To add a device (Standard Order), follow these steps:
- Select the "+" icon
- Select "Add Device"
- Enter the 8-digit Registration Code from the device's WiFi menu or Services menu
- Enter the device's Nickname
- Select the "Add Device" button
- With "Standard Order" selected, the newly added device will be displayed alphanumerically


"Custom Order" lets you arrange your list of devices in a way that you choose yourself, and the feature is enabled, when you have two or more devices.
To add a device (Custom Order), follow these steps:
- Select the "+" icon
- Select "Add Device"
- Enter the 8-digit Registration Code from the device's WiFi menu or Services menu
- Enter the device's Nickname
- Select the "Add Device" button
- Select "Cancel" button on the pop-up
- When you have a "Custom Order" your new device will be listed in the bottom of the device's list


9. How do I change a device's name, delete a device and edit order of devices?
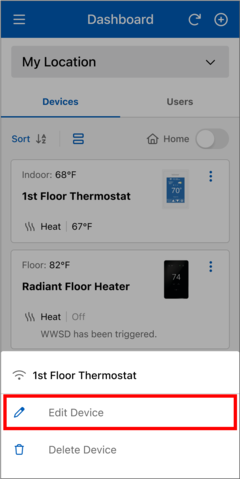
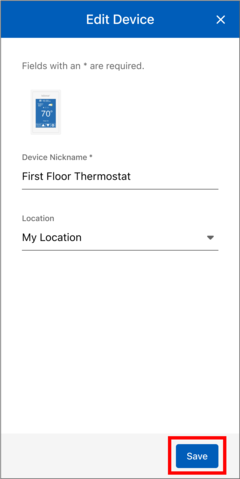
Edit the device's name or its location by following these steps:
- Select the device's location
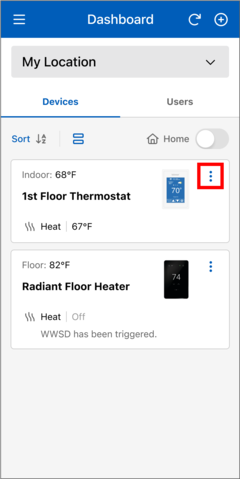
- Select the ellipsis icon of the device
- Select "Edit Device"
- Edit the device Nickname and/or device's location
- Select "Save" button

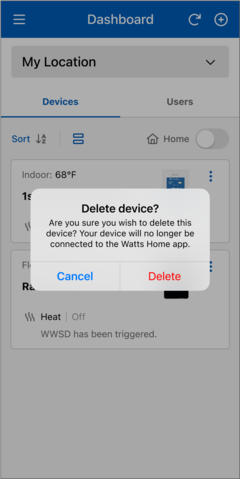
Delete a device by following these steps:
- Select the device's location
- Select the ellipsis icon of the device
- Select "Delete Device"
- Select "Delete" to confirm the deletion

When Custom Order is selected, follow these steps to edit the order of your devices:
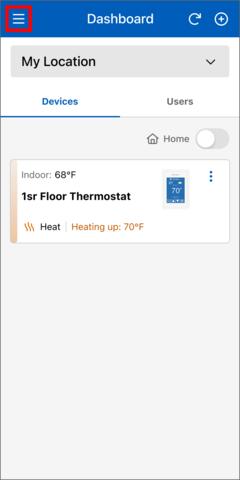
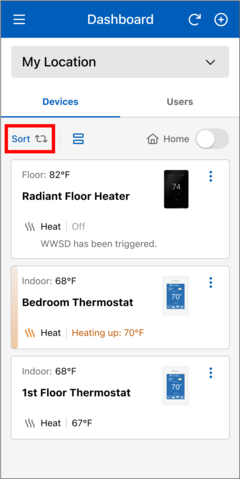
- Select the "Sort" button on the Dashboard page
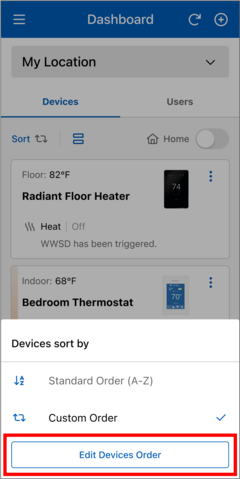
- Select the "Edit Devices Order" button from the bottom menu. This button is only enabled when "Custom Order" is selected.
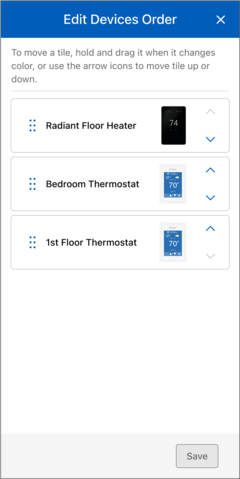
- On the "Edit Devices Order" page to move the device tile, press and hold until it changes color, then drag and drop it to your desired destination. Alternatively, you can use the arrow icons to move it up or down.
- Select the "Save" button once you've made changes to the order

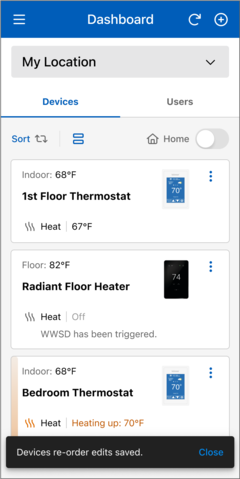
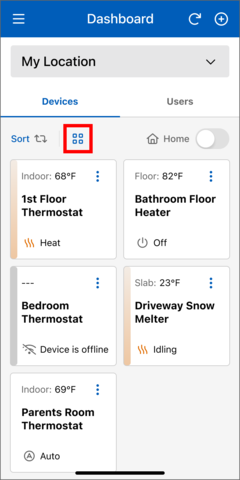
10. How do I change the Dashboard layout view?
If your location has two or more devices, you can switch between list view and grid view on its Dashboard page.
- List view provides a comprehensive overview of each device, including the device nickname, indoor/floor/slab temperature, mode, setpoint temperature(s), device image, and additional status details.
- Grid view shows more devices at once, but with less information provided about each device that includes, the device nickname, indoor/floor/slab temperature, and current mode.
The Dashboard icon indicates the currently selected layout. To switch views, tap the icon.

11. Why is the app rejecting the device Registration Code?
The Registration Code is valid for 30 minutes before it expires.
Double check that you are using the correct mobile app for the device. The Watts Home app is NOT compatible with the following equipment:
- tekmarNet Gateway 486 (download tekmarNet Gateway app)
- Smart Boiler Control 294 (download Watts OnSite app)
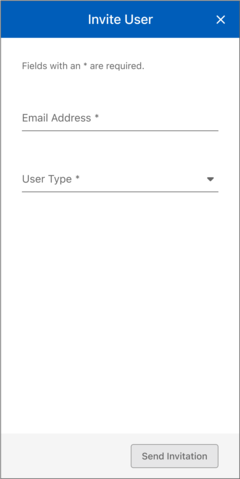
12. How do I share access to my devices to others, such as my family or building caretaker?
The person that creates a location and adds new devices becomes the location's owner.
The owner can then invite other users to view and adjust the devices at that location by following these steps:
- Select the "+" icon
- Select "Invite User"
- Enter the email address of the user and choose the user type, where the "Contractor" and "Guest" user types have the same permissions, and it is at the location's owner discretion on choosing the user type
- Select "Send Invitation" button
The invited user will receive an email with a link to setup their Watts Home account and the location will be added to their list.


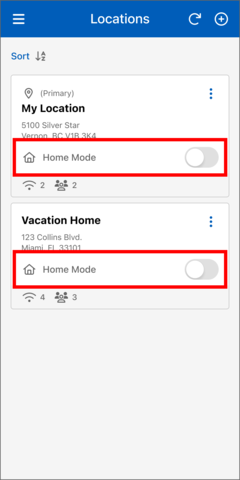
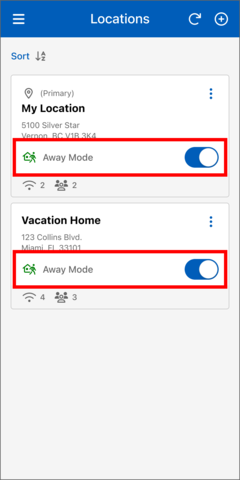
13. How does the Home/Away toggle work?
The Home/Away toggle lets you save on energy costs while you are away from your building location for a day or more. Simply set your location to “Away” and all thermostats operate at an energy saving setting for both heating and/or cooling, and the snow melting system has the option to not melt. Prior to your return, set the location to “Home” and all thermostats and the snow melting system will resume normal operation.
If the location is unoccupied on a predictable, repeating schedule, it is recommended to set up a schedule rather than using the Home/Away toggle.
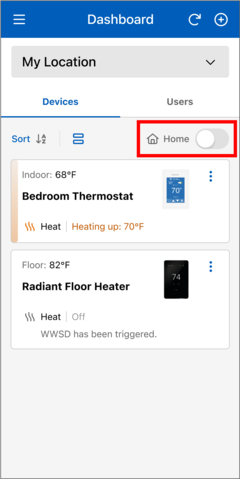
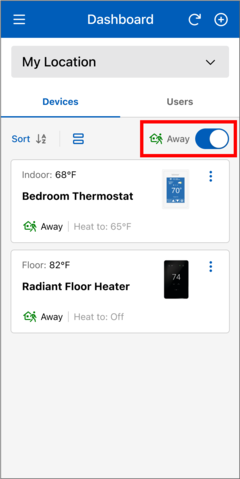
If you have multiple locations, the Home/Away toggle can be selected from the location list.

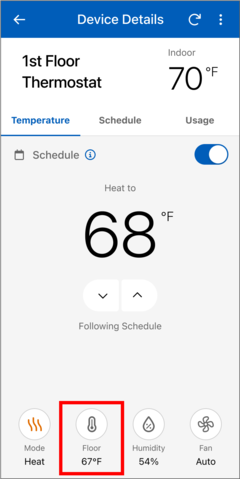
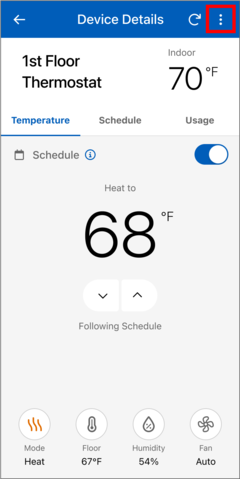
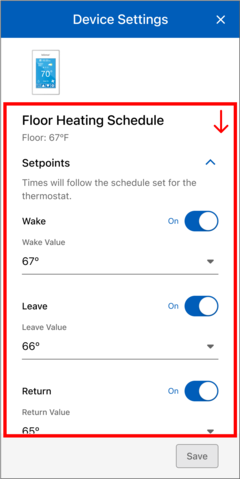
14. How do I change the Floor Heating temperature?
The tekmar Thermostats 561, 562, 563 and 564 support a Floor Heating temperature. It is only shown if configured and a floor sensor is installed.
- In the Watts Home app, go to the thermostat's Device Details page.
- Select the "Floor" button on the Device Details page where the temperature reading from the "Floor" sensor is indicated.
- Make the necessary adjustments to the Floor Heating settings using the bottom menu.
- Click the "Save" button to apply your changes.

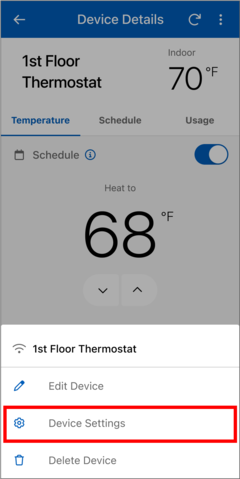
Alternatively, you can provide changes on the Device Settings page:
- In the Watts Home app, go to the thermostat's Device Details page.
- Select the ellipsis icon.
- Select Device Settings.
- Make the necessary adjustments to the Floor Heating settings on the Device Settings page.
- Click the "Save" button to apply your changes.
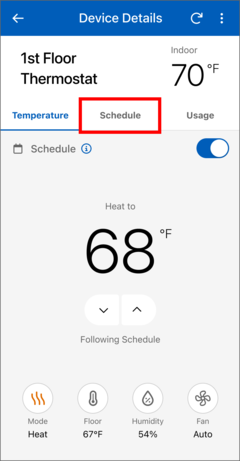
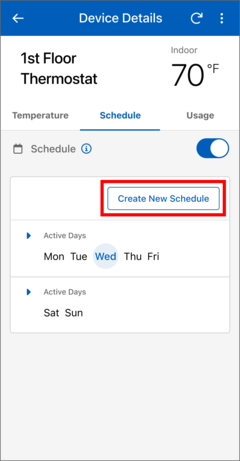
15. How do I change the device schedule?
- In the Watts Home app, go to the thermostat's Device Details page
- Select Schedule
- Select the "Create New Schedule" button
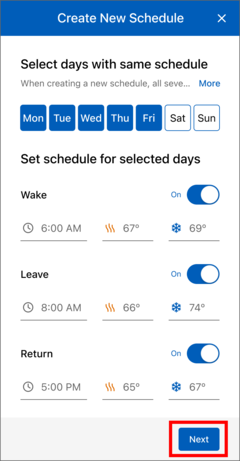
- Select the days of the week that share the same daily schedule and set up their daily schedule preferences eg., if Monday through Thursday have the same schedule, select those days and set their Wake, Leave, Return, and Sleep preferences.
- Next, set up the schedule for the remaining days, if necessary.
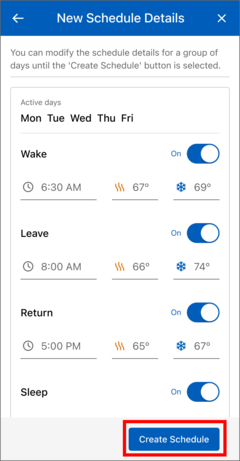
- Review the details on the "New Schedule Details" page. When everything looks correct, click "Create New Schedule".

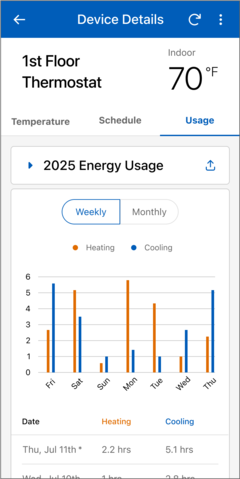
16. How do I view the energy usage?
- In the Watts Home app, go to the thermostat's or snow melt control's Device Details page
- Select Usage
- You can view your device's weekly and monthly energy usage.
- As a Location Owner, you can request a usage snapshot by email. Select the "Send" icon, then choose the Usage file format from the bottom menu.
- Next, tap "Send Snapshot" to receive it by email.


17. How do I open the energy usage report?
When you request the energy usage report's CSV file format, this file format can be opened using a spreadsheet program, such as Microsoft Excel. When the report's PDF file format is requested, Adobe Reader can be used to view it.
Note: Special characters in the device nickname may not display correctly in the email subject or body. In some cases, they may not appear at all or may be shown as escape characters.
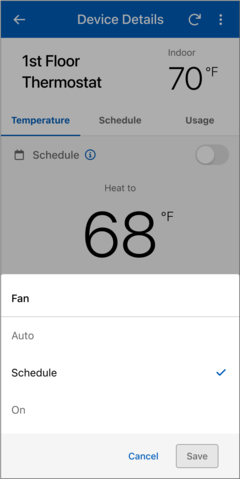
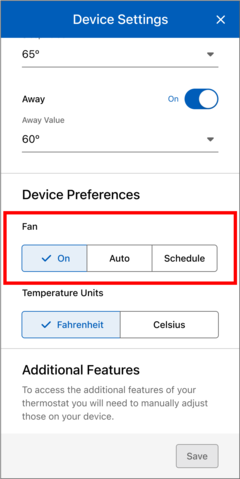
18. How do I change the fan operation?
The tekmar Thermostats 562, 563 and 564 support fan operation
- In the Watts Home app, go to the thermostat's Device Details page
- Select the "Fan" button on the Device Details page
- Make the necessary adjustments to the Fan settings using the bottom menu
- Click the "Save" button to apply your changes

Alternatively, you can provide changes on the Device Settings page:
- In the Watts Home app, go to the thermostat's Device Details page
- Select the ellipsis icon
- Select Device Settings
- Make the necessary adjustments to the Fan settings on the Device Settings page
- Click the "Save" button to apply your changes


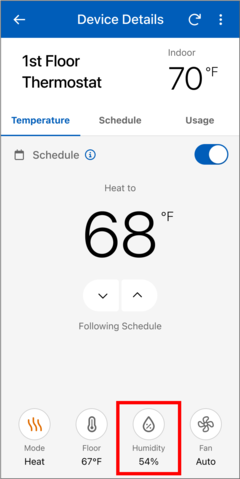
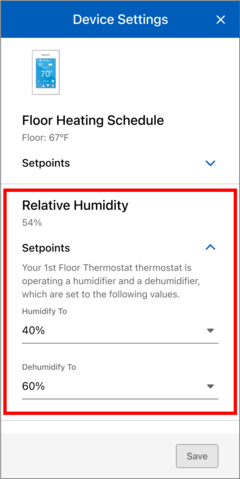
19. How do I change the humidity settings?
The tekmar Thermostats 563 and 564 support a relative humidity sensor, whose reading is shown as indicated below. Additionally, these thermostats can control the operation of either a humidifier and/or a dehumidifier if configured/installed.
- In the Watts Home app, go to the thermostat's Device Details page
- Select the "Humidity" button on the Device Details page
- Make the necessary adjustments to the Humidity settings on the Device Details bottom menu
- Click the "Save" button to apply your changes

Alternatively, you can provide changes on the Device Settings page:
- In the Watts Home app, go to the thermostat's Device Details page
- Select the ellipsis icon
- Select Device Settings
- Make the necessary adjustments to the Humidity settings on the Device Settings page
- Click the "Save" button to apply your changes


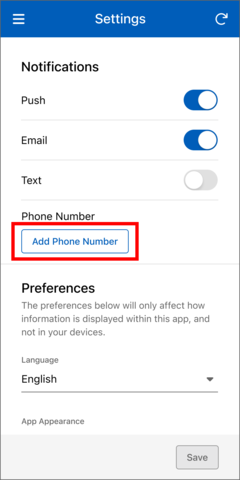
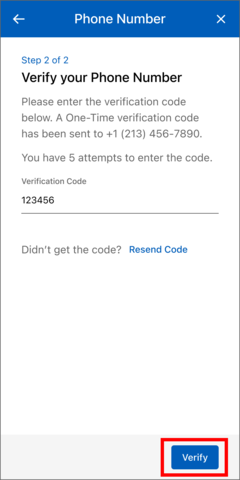
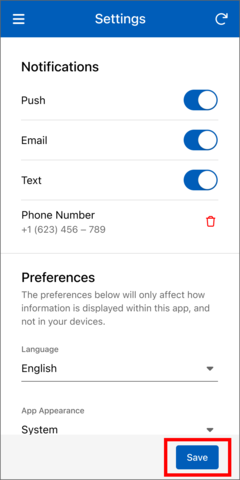
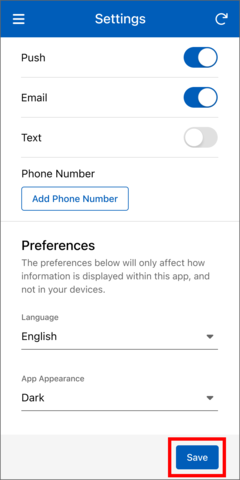
20. How do I setup the app to receive alert notifications?
There are 3 ways to receive the notifications:
- Push – Messages from the Watts Home app on your mobile phone
- Email – Emails will be sent to your email inbox
- Text – Messages will be sent to your mobile phone number


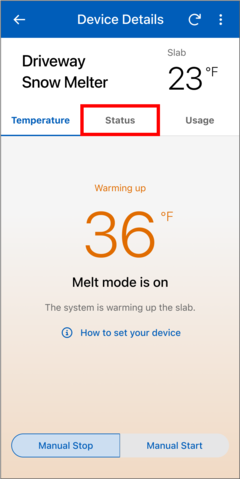
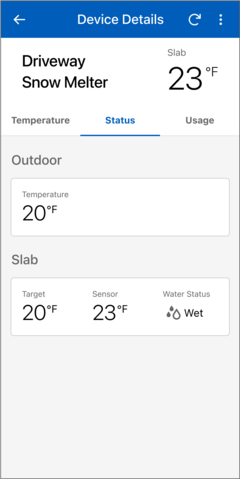
21. How do I view the status of the sensors for my snow melt system?
- In the Watts Home app, go to the snow melt control's Device Details page
- Select Status
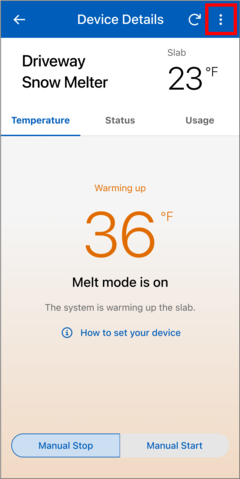
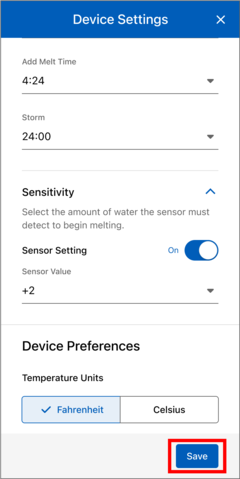
22. How do I change the settings on my snow melt system?
- In the Watts Home app, go to the snow melt control's Device Details page
- Select the ellipsis icon
- Select Device Settings
- Adjust settings
- Click the "Save" button to apply your changes


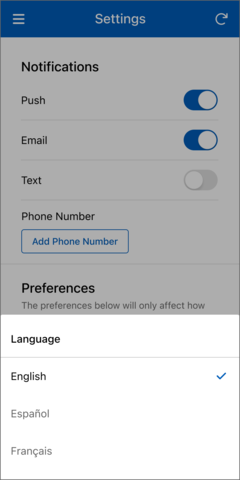
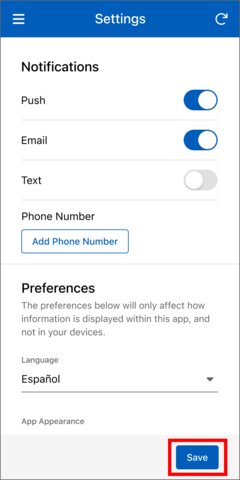
23. How do I change the language?
- Select Menu
- Select Settings
- Select the preferred language
- Select Save
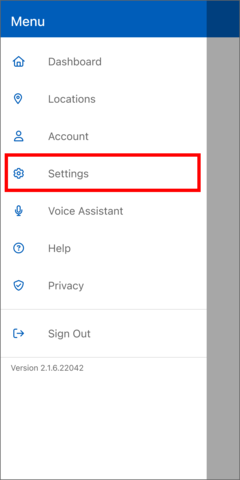

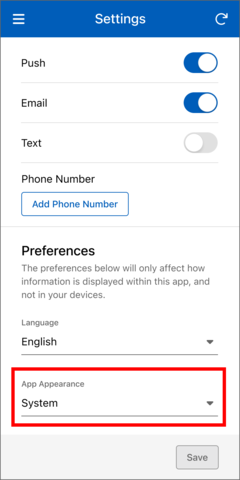
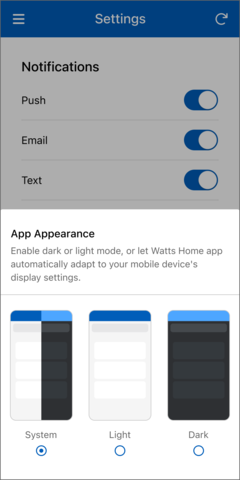
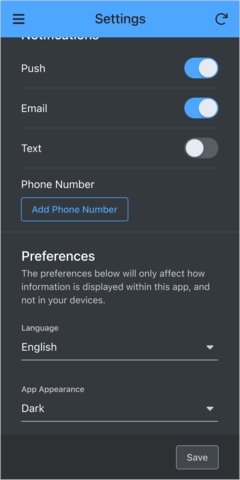
24. How do I change the app appearance?
- Go to the Settings from the main Menu
- Select App Appearance
- Select your preferred app appearance from the bottom menu
- Select Save
The app offers three appearance options: Light, Dark, and System. When System is selected, the app will automatically match your mobile device's appearance settings.

25. Does the app work on tablet devices?
The app is available for tablet devices and can be downloaded for the App Store or Google Play.
You can use the app on tablets in two orientations: portrait or landscape (by rotating the device).


26. Google Home in-app integration.
tekmar 564 and SunTouch Command Plus thermostats can be controlled using voice commands via Google Home.
Within the app, you are able to manage Watts Home connections to Google Home.
a. How to link Watts Home account to Google Home
- Download and install the Google Home app on your mobile device
- Register or log in to the Google Home app
- Open the Watts Home app and navigate to "Voice Assistant" in the main menu
- Select Google Home
- Tap Link. You'll be redirected to the Google Home app
- Accept the terms and conditions to continue
- Next, in the Google Home app, choose the compatible device(s) and tap Next
- Select an existing Home or create a new one for the device(s), then tap Next
- Assign the device(s) to a Room and tap Next
- The newly added device(s) will now appear on your Google Home dashboard
Once you link Watts Home with Google Home, you'll need to switch back to the Watts Home app manually to use it.
b. How to unlink Watts Home account from Google Home
- Download and install the Google Home app on your mobile device
- Register or log in to the Google Home app
- Open the Watts Home app and navigate to "Voice Assistant" in the main menu
- Select Google Home
- On the Google Home screen, tap the Manage Connection button
- On the Google Home app navigate to Settings, then select "Works with Google" under Services
- Find Watts Home in the list and tap on it
- Tap "Unlink account" and confirm to remove the connection
Once you unlink Watts Home with Google Home, you'll need to switch back to the Watts Home app manually to use it.
27. Amazon Alexa in-app integration.
tekmar 564 and SunTouch Command Plus thermostats can be controlled using voice commands via Amazon Alexa.
When linking via Amazon Alexa, the login page will open in your mobile device's default language.
Within the app, you are able to manage Watts Home connections to Amazon Alexa.
a. How to link Watts Home account to Amazon Alexa
- Download and install the Amazon Alexa app on your mobile device
- Register or log in to the Amazon Alexa app
- Open the Watts Home app and go to Voice Assistant from the main menu
- Choose Amazon Alexa
- Tap Link
- On the Amazon Account Linking page, select Link
- On the consent screen, tap Agree and Link
b. How to unlink Watts Home account from Amazon Alexa
- Download and install the Amazon Alexa app on your mobile device
- Register or log in to the Amazon Alexa app
- Open the Watts Home app and go to Voice Assistant from the main menu
- Choose Amazon Alexa
- On the Amazon Alexa screen in the Watts Home app, tap Unlink
- Confirm by selecting Unlink again
28. I registered a device but now it’s missing:
There are different reasons for a missing device:
- The device isn’t listed in the default location. Please check all your locations.
- Somebody de-registered the device in the WiFi menu of the control.
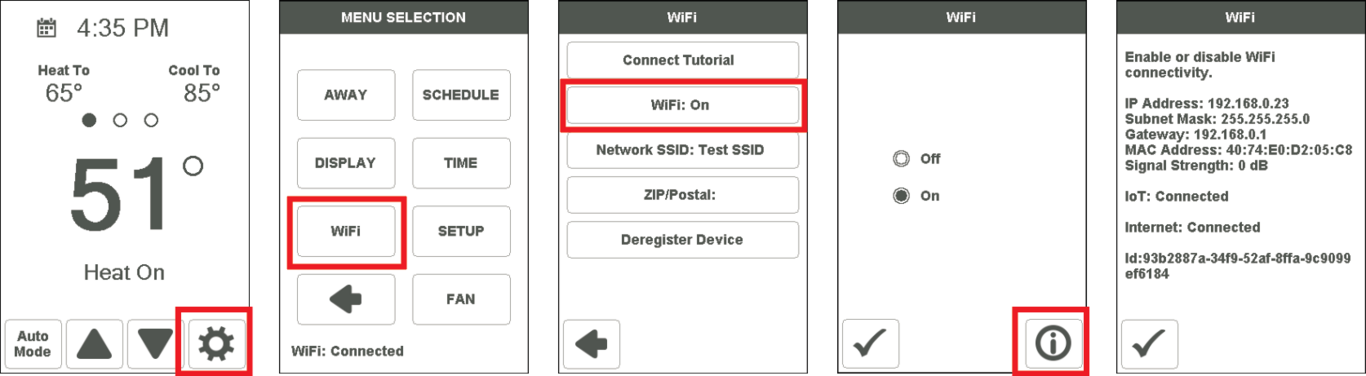
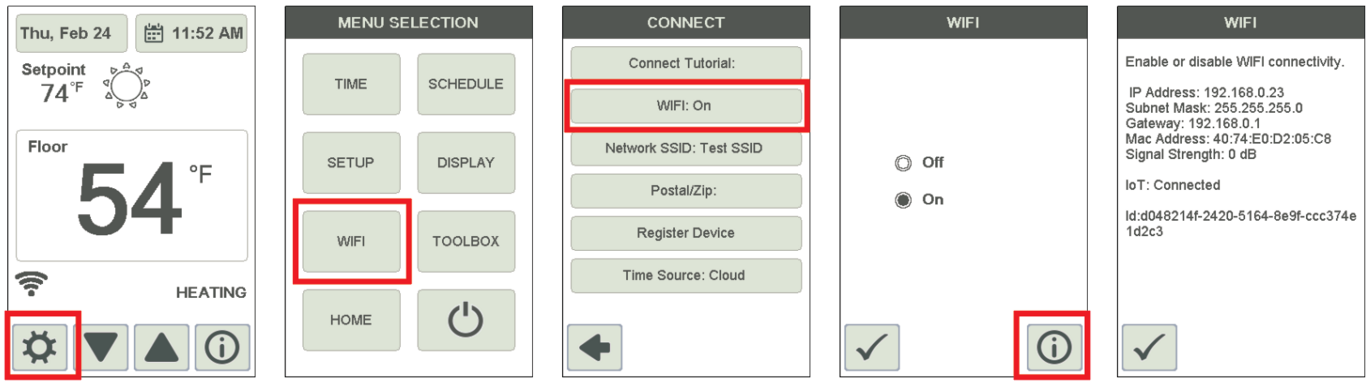
29. The app shows that the device is not available. How do I correct this issue?
Check the Internet and IoT connection status on the device.
If the Internet is disconnected, check that the WiFi signal strength is between -10 to -70 dB, powering the router off and then on, and that “bandsteering” on the router is disabled.
If IoT is disconnected, the router may be blocking an outbound connection to the Watts cloud.
On the tekmar Setpoint Control 170 and WiFi Thermostats 561, 562, 563, 564:
- Select Gear
- Select WiFi
- Select WiFi: On
- Select WiFi Info
On the tekmar Snow Melting Control 670 and 671:
- Select Settings
- Select WiFi
- Select Help

On the SunTouch Connect Thermostat:
- Select Gear
- Select WiFi
- Select WiFi: On
- Select WiFi Info
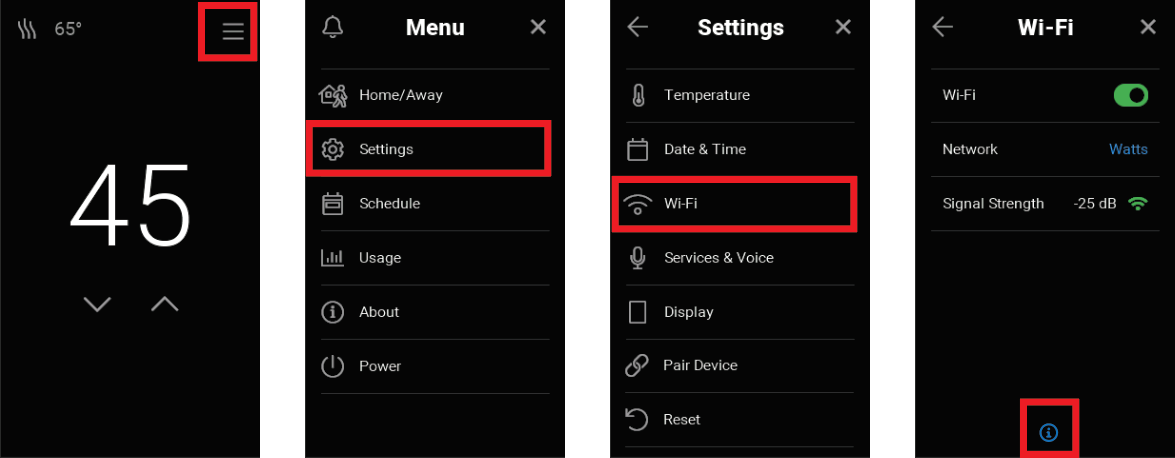
On the SunTouch Connect Plus and Command Plus Thermostats:
- Select Menu
- Select Settings
- Select Wi-Fi
- Select the Info icon
30. Who can help me?
For additional product information, such as manuals and product specifications, please visit our websites:
- tekmar: https://watts.com/tekmar
- SunTouch: https://www.suntouch.com/
To contact our technical support team:
- tekmar products: [email protected]
- SunTouch products: [email protected]
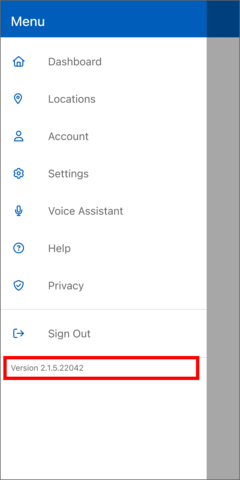
31. How do I check my software version?
- Select the menu icon (3 lines in the upper left corner)
- The software version is displayed below the Sign Out option in the popout menu